{{text}}
Share
The Footer is one of the most underrated elements in website design, as our Webflow agency Synqro.
However, it plays an essential role inuser experience, information organization and SEO optimization.
In Webflow, the footer can be customized in an advanced way to match your design while offering efficient navigation.
In this article, we'll explore in detail how to create, customize, and optimize a Webflow footer so that it meets the expectations of users and search engines.
1. What is a webflow footer and why is it important?
The footer, or footer, is the section at the very bottom of your website. While it may seem secondary, it serves several crucial functions, including:
a) Provide essential information in the footer
The footer is often where visitors expect to find information like:
• Company contact details.
• Links to the legal notices and the privacy policy.
• Links to social networks.
b) Improve navigation thanks to the footer
A well-designed footer can include quick links to key pages of the site, facilitating access to important resources.
c) Contribute to SEO with the webflow footer
An optimized footer can help:
• Strengthen the internal network through strategic links.
• Improve the hierarchy of content for search engines.
d) Add elements of trust in your footer
The certifications, awards or testimonies included in the footer reassure visitors and strengthen your credibility.
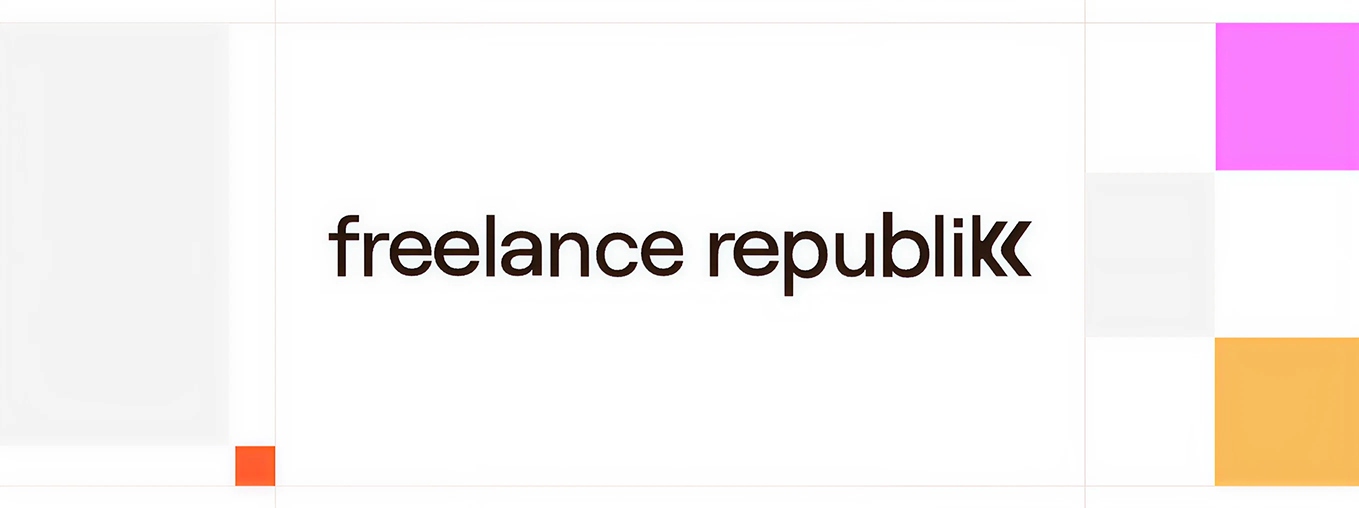
Synqro footer example
2. Creating a Webflow Footer
Need help designing a footer on Webflow?
Check out this video tutorial from Webflow which details the step-by-step process for creating a professional and reusable footer. By following the tips in this video, you'll learn how to structure, customize, and optimize this critical section of your site. An essential resource to improve navigation and the overall appearance of your pages!
What the video covers:
- Step by step : The creator demonstrates each phase, from setting up the structure to customizing the design.
- Practical advice : Tips for aligning items, organizing information, and ensuring a professional aesthetic.
- Creating a Symbol : The video shows how to transform the footer into a Symbol to reuse it effectively on all pages of your site.
a) Add a footer section
1. In the panel Elements, select a Section Div to create a new section in your canvas.
2. Place this section at the bottom of your page and then give it a specific identifier, such as “footer.”
b) Structure your footer
An effective footer should be well organized. Here are the main blocks you can include:
• Navigation block : Links to the main pages (Home, About, Services, Blog).
• Contact information : Address, email, telephone.
• Social media links : Clickable icons to your social profiles.
• Legal information : Link to the privacy policy and the terms and conditions.
• Calls to action : A newsletter subscription form or a “Contact us” button.
c) Advanced customization
Webflow allows complete customization:
• Add columns to separate the different sections of the footer.
• Customize fonts, colors, and spacing to meet your design guidelines.
• Add icons for social networks using the component Image.
3. Responsive optimization for a Webflow footer
a) Ensure readability on all screens
• Test the footer on all devices (desktop, tablet, mobile).
• Adjust font and icon sizes for better readability.
b) Reorder items on mobile
On small screens, use a vertical layout for the footer elements. Use the options of Flexbox Or of grille of Webflow for a smooth adaptation.
4. Essential content to include in a Webflow footer
a) Secondary navigation
Add quick links to the most visited or important pages, such as:
• Services
• Blog
• FAQ
• Contact
These links enhance the user experience and increase the time spent on the site.
b) Legal information
To stay in compliance with regulations (e.g. GDPR in Europe), include links to:
• The privacy policy.
• The general conditions of use.
• Legal information.
c) Social networks
Include icons for your social profiles, but make sure they open in a new tab so as not to interrupt navigation on your site.
d) Call to action (CTA)
A newsletter subscription form or a “Request a quote” button can turn your footer into a conversion tool.
e) Branding
Add your logo or a simplified version to reinforce your visual identity.
5. Best practices for an optimized Webflow footer
a) Keep the design simple and clean
An overloaded footer can distract your visitors or make key information hard to find. For a clean design:
• Limit the colors and fonts used to maintain visual consistency.
• Organize information into well-defined blocks for better readability.
• Add spaces between items to avoid a “compressed” effect.
b) Use contrasts for readability
Make sure that the text and icons on your footer are legible regardless of the background. For example:
• Use light text on a dark background (and vice versa).
• Test readability by simulating visual disabilities with tools like the accessibility simulator stark.
c) Add custom visuals
Webflow allows you to integrate illustrations or light animations into your footer. For example:
• An interactive map with the location of your business.
• An animated icon for the newsletter subscription form.
d) Include relationships of credibility
Visitors are looking for elements that reassure, especially for e-commerce or B2B sites. In your footer, include:
• Partner logos or certifications.
• Customer reviews or testimonials.
• Guarantees (e.g.: “Satisfied or refunded”).

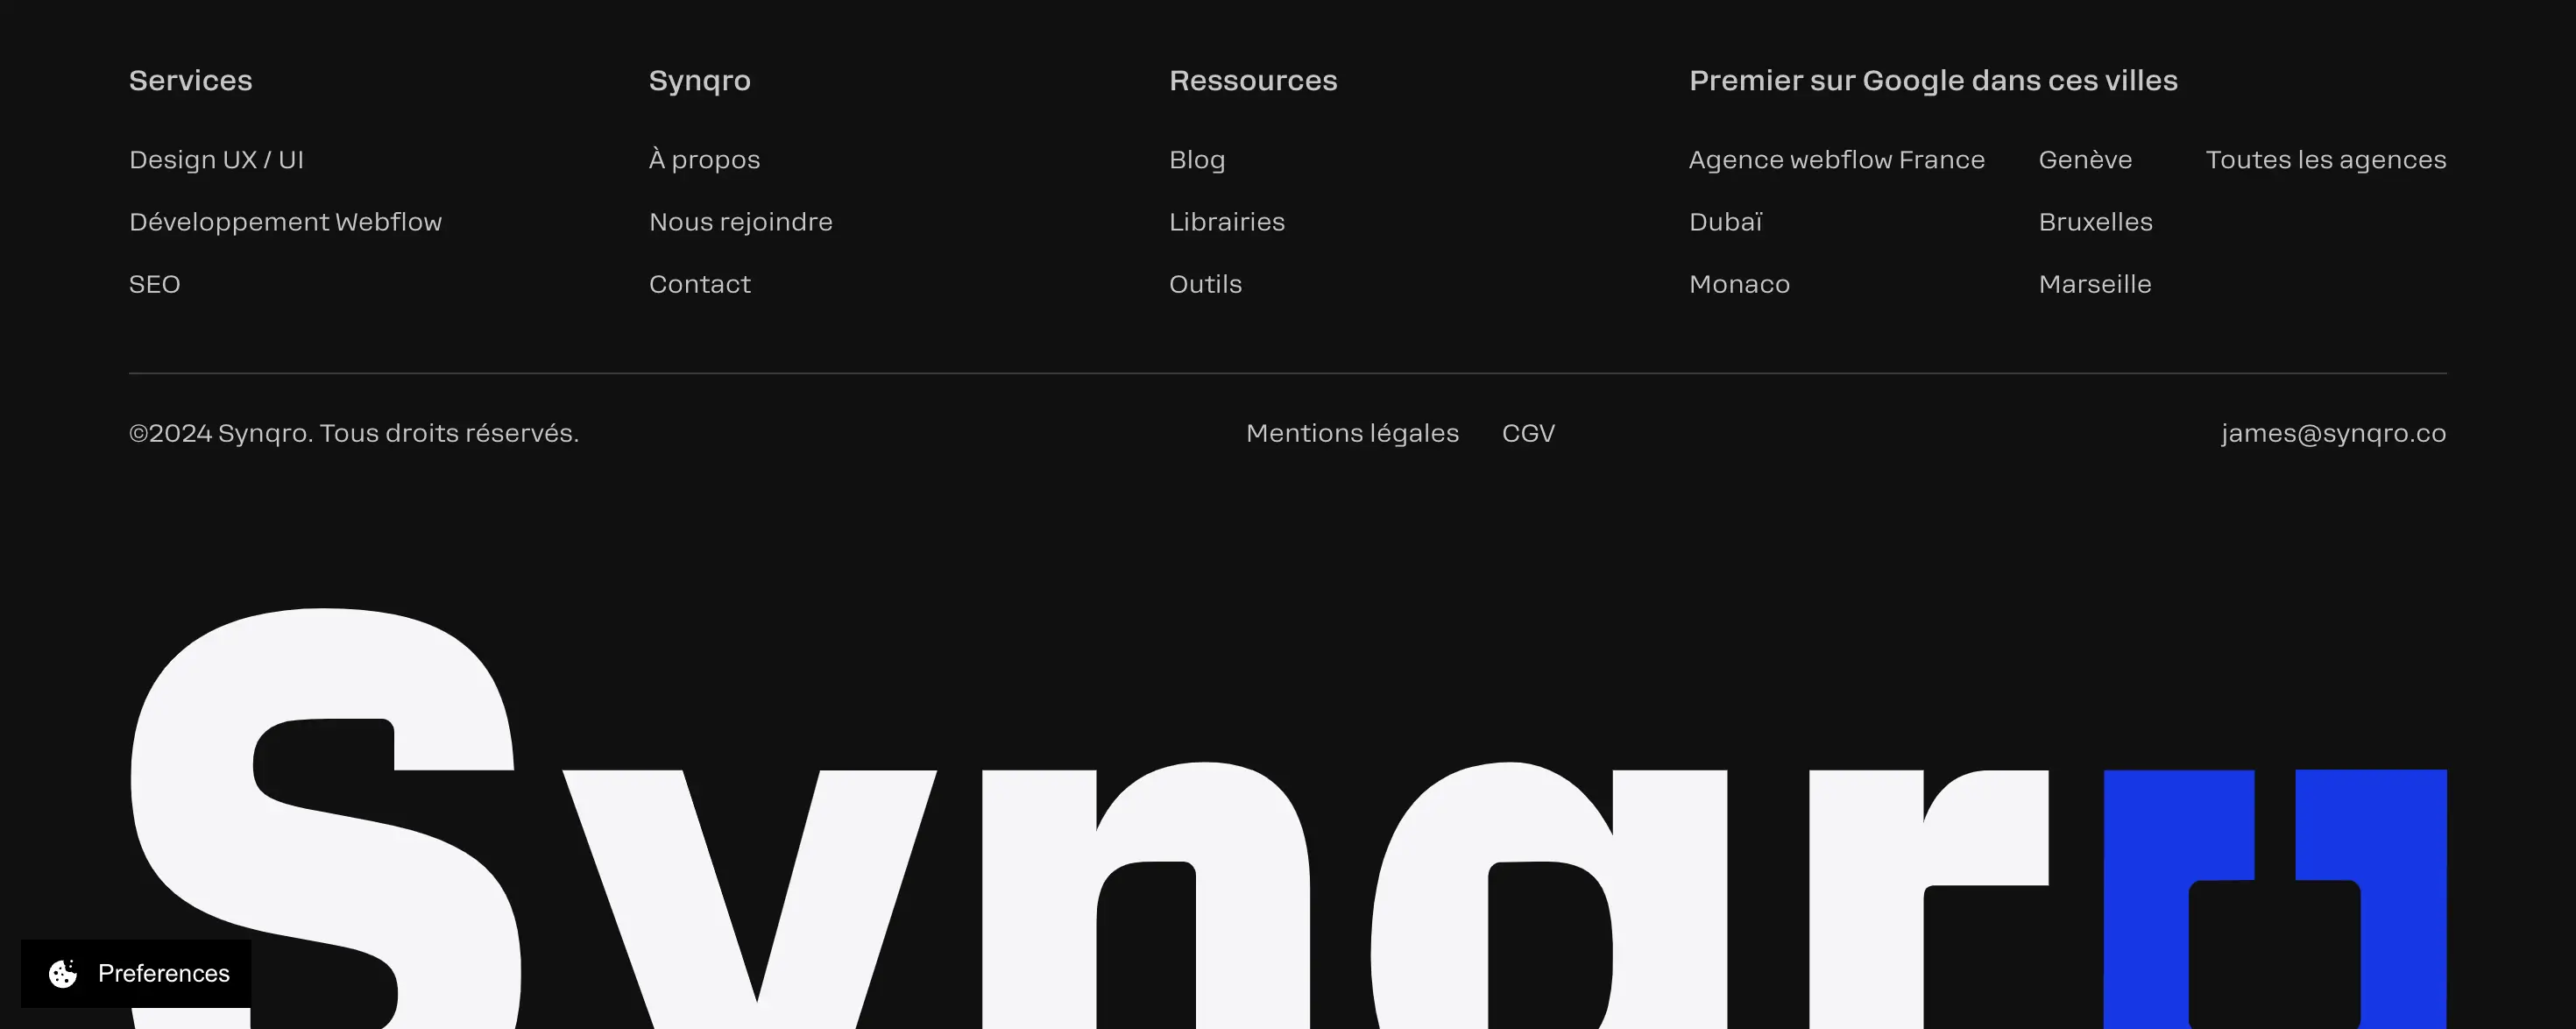
Webflow Footer example
6. SEO optimization for a Webflow footer
A well-optimized footer contributes to your SEO strategy by strengthening the structure and internal links of your site. Here's how to maximize the SEO impact of your footer:
a) Prioritize your internal links
Google gives more or less weight to links depending on their placement on a page. Footer links have less SEO weight compared to links located in the main body, but they are still important for:
• Repeat key pages.
• Link pages with low visibility, such as FAQs or legal notices.
Include strategic links to pages that are important for conversions or SEO in your footer.
b) Use optimized anchors
When adding links to the footer, use anchor text that contains keywords. For example:
• Use “Webflow Development Services”, “Motion”, “Interview” instead of Expertise 1, 2, 3...
• Avoid generic anchors like “Click here.”
c) Add a site map
For larger sites, include a sitemap (site map) in the footer makes it easier for users to navigate and helps search engines better understand your structure.
d) Highlight your location
If you're targeting a local audience, include your exact contact information in the footer:
• Company name
• Full address
• Telephone
• Opening hours
Also add local structured data (Schema.org) to improve your visibility in location-based searches.
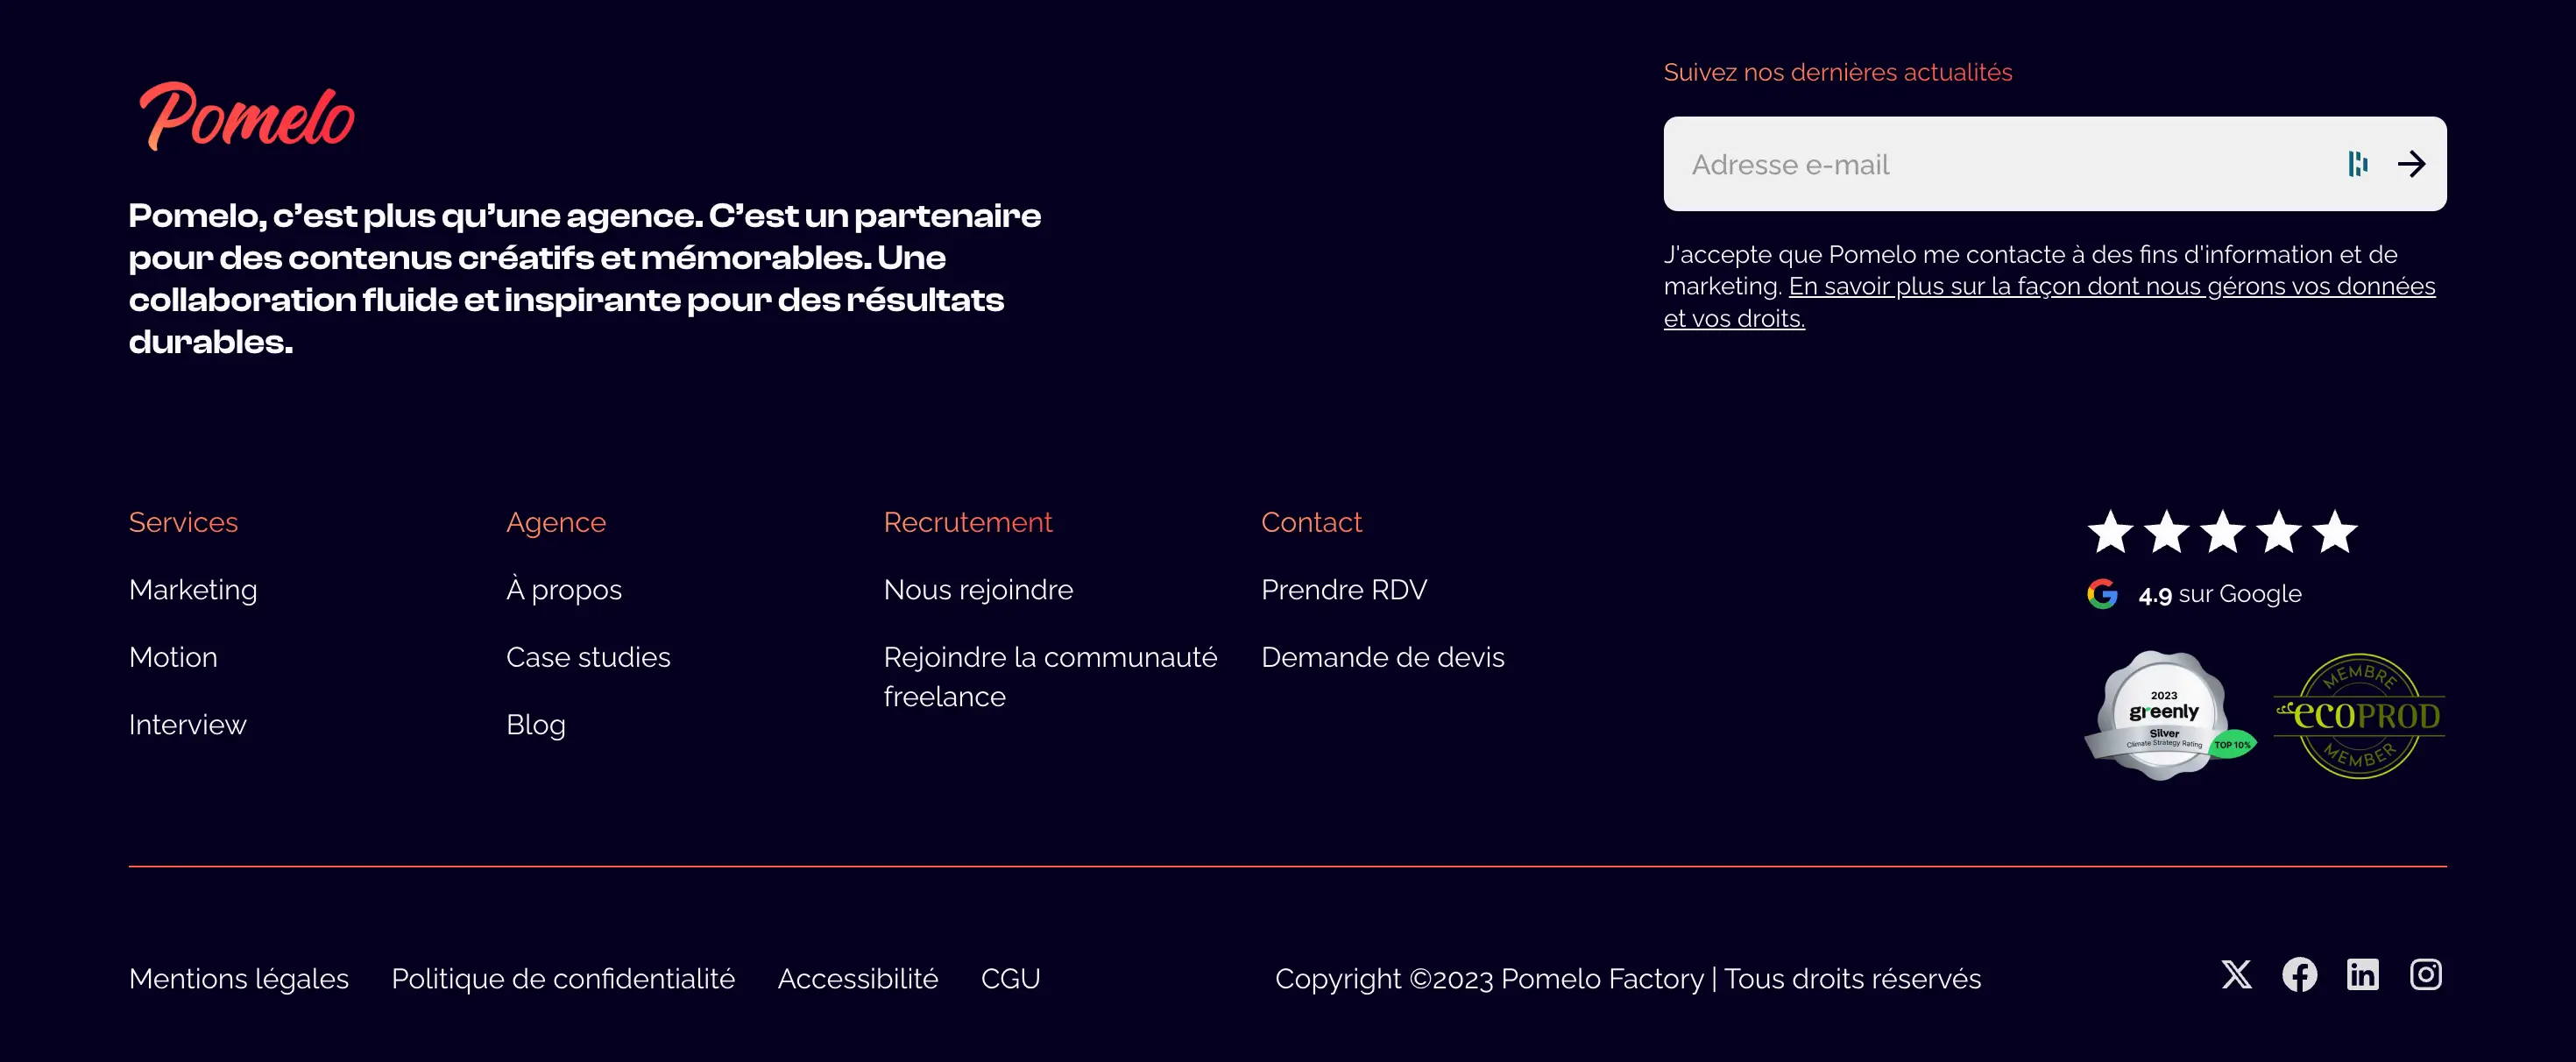
Example of Footing on Webflow in 2025
7. Examples of successful footers in Webflow
Example 1: Minimalist footer
• Simple structure with three columns:
1. Logo + short description.
2. Navigation links (Home, Services, Blog).
3. Social media icons.
• Ideal for showcase sites.
Example 2: Detailed footer for an online store
• A column dedicated to subscribing to the newsletter.
• A column with the main categories (Male, Female, Children).
• A column containing legal information and contacts.
• Payment icons accepted (Visa, PayPal, etc.).
Example 3: Interactive footer for a SaaS site
• Clearly visible “Schedule a demo” button.
• A list of resources: Blog, Documentation, FAQ.
• Testimonials or logos from satisfied customers.
8. Common Webflow footer problems and solutions
a) Poor rendering on mobile
Problem: Footers with multiple columns may appear disorganized on small screens.
Solution: Use options from Flexbox Or of Grid for columns to stack vertically on mobile.
b) Broken links
Problem: If a link changes on the main site, it may become outdated in the footer.
Solution: Check your internal links regularly with a tool like Screaming Frog.
c) Excessive size
Problem: A footer that is too big can distract users.
Solution: Do a visual audit and limit the information to what is really needed.
d) Charging time
Problem: Adding too much media (images, animations) to the footer can slow down your site.
Solution: Optimize all your files before integrating them into Webflow (ex.: compress images with TinyPNG).
9. Advanced features for a Webflow footer
a) Add a dynamic registration form
Use Webflow CMS to create a form that connects registrations directly to tools like Mailchimp or HubSpot.
b) Integrate dynamic flows
You can show:
• The latest posts on your blog.
• Your latest posts on Instagram or Twitter.
c) Add subtle animation
Make your footer more engaging with lightweight interactions:
• Social icons that change color when hovered
• A smooth transition for clicked links.
d) Attach a sticky footer
If your site has little content, consider a Footer Sticky that remains visible at the bottom of the screen, even when the user scrolls down the page.
11. Create a sticky footer with Flexbox
How do I create a sticky footer with Flexbox?
You can use Flexbox to attach a footer to the bottom of each page on your site, regardless of the amount of content above. Here are the steps you need to take to do this effectively.
Step 1: Initial Setup
Before you get started, make sure you have a footer added to your site and get familiar with using Flexbox. Here's how to prepare your site:
- Apply Flexbox to the body of the page (Body)
The styles defined on the Body tag (all pages) apply to all pages on your site. So you can configure the layout of your design with Flexbox:- Select the Body element in the Canvas or via the Navigator.
- Access the styles panel (Style panel) > Selector (Selector field).
- Choose Body (All pages) in the dropdown menu.
- In the styles panel, go to Layout (Layout) > Display.
- Click on Flex.
- Click on the downward arrow icon to set the direction of the flex by vertical.
Step 2: Attach the footer to the bottom of the page
By configuring the Body (parent of all elements on the page) in Flex, you can set an automatic top margin on the footer. This allows the footer to “push” content above it and stick to the bottom of the page.
Here's how to set the automatic top margin:
- Select the footer In the Canvas or via the Navigator.
- Access the styles panel (Style panel) > Spacing (Spacing).
- Define the upper margin (Top Margin) on “auto”.
Operation and results
- On pages with little content : The automatic top margin creates a white space that pushes the footer downwards, ensuring its correct positioning.
- On pages with a lot of content : The footer respects the content above it without adding unnecessary space, remaining in its logical place at the bottom of the page.
11. Why is an optimized Webflow footer essential for your site?
One Webflow footer well-designed not only improves the appearance of your site, but also contributes to:
• Retain your visitors : By providing them with clear and accessible information.
• Strengthen your branding : With consistent visual elements.
• Boost your conversions : Thanks to well-positioned CTAs.
• Optimize your SEO : With strategic links and local data.
Whether you manage a showcase site, an online store, or a SaaS platform, don't underestimate the power of a successful footer. Chez Synqro, we help businesses maximize their impact with custom Webflow designs.
Conclusion on creating a footer on Webflow
A footer is not just a simple formality to finish a web page. With Webflow, it becomes a real opportunity to improve the user experience, boost your SEO and strengthen your brand image. By applying the best practices mentioned in this article, you will transform your footer into a strategic asset for your site.
Do you want to go further with a professional Webflow design? Contact us today at Synqro, and we'll help you create a site that impresses and converts.
Webflow Footer FAQ
What is a webflow footer in a website?
A footer, or footer, is an essential section located at the bottom of every web page. Indeed, it often contains important information such as contact details, navigation links, legal notices, or even social media icons.
In addition, in Webflow, this footer can be fully customized to match your needs and your image. For example, it can integrate tags to improve your SEO or responsive design to adapt to all devices.
Why is the footer important for a website?
The footer fulfills several essential roles for each page of your website:
- Navigation : It offers quick links to the main pages such as the home page or the search results.
- SEO : Since the footer strengthens the internal network, it helps search engines to better understand the structure of your website.
- Legal compliance : It often includes mandatory links, such as the privacy policy or legal notices, which is crucial for your image and site redesign.
- Brand image : Thus, it can reinforce your branding by displaying your logo, certifications or even your domain name.
How do I create a footer in Webflow?
To create an effective footer in Webflow:
- Add a section at the bottom of your home page or other web pages.
- Use div blocks or a grid to structure content.
- Add the required elements: for example, links, images, or a form.
- Customize the look and feel using HTML code or CSS in the style editor to match the responsive design.
- Finally, check the responsiveness on each device, so that the footer is ergonomic and well integrated.
What is the essential information to include in a footer?
An optimized footer should include the following:
- Links to the main web pages (e.g.: Home, Contact, or Blog).
- Legal notice and privacy policy to comply with legal obligations.
- Business contact information, such as address, phone, and email.
- Social media icons, including Facebook or LinkedIn.
- A newsletter subscription form or a CTA to encourage clicks and improve engagement.
How to optimize a Webflow footer for SEO?
To optimize your footer and search results:
- Add strategic internal links, as well as optimized anchors like “Create a website.”
- Include localized information if your web agency is targeting a regional audience.
- Use clear guidelines and avoid unnecessary repetition.
- Also, check that your footer is responsive, as smooth navigation improves the user experience.
Is a Webflow footer responsive by default?
Yes, in Webflow, footers are responsive by default. However, you should test their display for each device (computer, tablet, mobile) in order to avoid ergonomic problems.
Additionally, use the built-in preview tool to adjust margins and element sizes as needed.
Can a form be included in a Webflow footer?
Absolutely! You can add a form in your footer, for example to subscribe to a newsletter or to make contact.
Set it up to send data directly to your CRM or email tool like Google Analytics or Mailchimp.
What is the ideal size for a footer?
A well-designed footer should be clear and functional. That's why it shouldn't be too big to weigh down the home page, but detailed enough to include all the essential information. Generally, a height of 150 to 300 pixels with a well-ventilated layout is ideal.
Can we create a sticky footer in Webflow?
Yes, it is entirely possible to create a sticky footer (fixed at the bottom of the screen). To do this, select the option Position: Sticky In the style panel and adjust the margins so that it remains visible, without interfering with the main content of your web pages.
What is the difference between a header and a footer?
- Header : Placed at the top of each page, it usually contains the logo, a navigation bar and sometimes a CTA (Call to Action).
- Footer : Located at the bottom, it includes additional information such as contact details, legal notices and secondary links. Thus, while the header guides the user as soon as they arrive on the site, the footer concludes the experience by providing practical details or final actions.
Synqro's latest achievement